Today’s Photoshop tutorial is going to be more a recommendation rather than an actual tutorial. And it’s more of a hardware recommendation compared to a software one.
What is that recommendation you ask? Get yourself a graphics tablet to improve your productivity in Photoshop.
Why can’t I just carry on using my mouse? Of course you can and probably will. I used nothing but a mouse for several years, with Photoshop, before getting a tablet. But once I got my first one, I never looked back. They give you more precise handling over your cursor with features like pen pressure and express keys. You can literally edit your images as if you were painting.
My tablet:
I have a Wacom Bamboo Pen and Touch tablet.
This particular tablet offers 4 programmable short cut keys called Express keys. These Express keys allow you to quickly and easily perform actions without having to resort to using your keyboard.
Some of the Express keys I set up are as follows:
- First key – Right click
- Second key – Zoom in
- Third key – Zoom out
- Fourth key – Alt
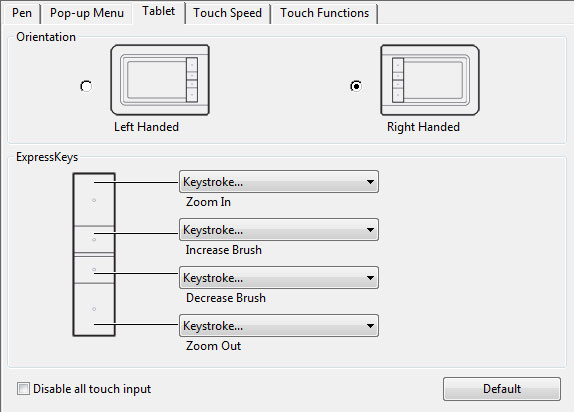
But as of writing this, I am thinking of changing things around to try it out. *Update: As you can see by the image above, I have already made the change and it’s working well so far*
- First key – Zoom in
- Second key – Increase brush size
- Third key – Decrease brush size
- Fourth key – Zoom out
Now, this model graphics tablet also has several touch capabilities.
These include:
- Tap with one finger to Click
- Add touch to left (This allows you to touch, drag your finger to an item, then tap with a second finger to select that item)
- Right click by tapping with 2 fingers
- Add touch to right (Same as left)
- Drag items (Just click. Hold. And move)
- Scroll by moving 2 fingers along the tablet
- Zoom by pinching
- Rotate using 2 fingers in a circular motion
- Back and forth. Tap 2 fingers and slide them in either direction
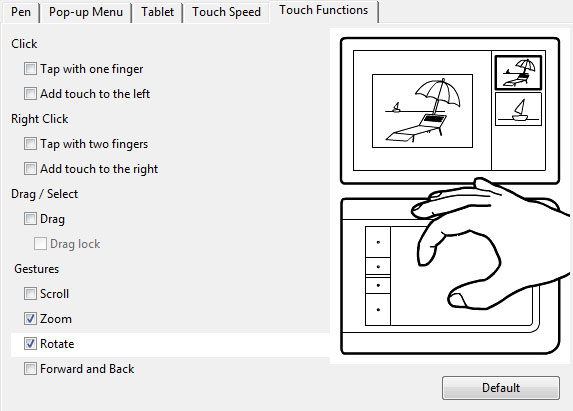
In all honesty, the only touch function I use is the Rotate function and Zoom function. The reason behind this is simple. If I am editing a photo, especially if it’s cutting something out or using the Photoshop pen tool, I don’t want to have to change to the rotate tool in the middle of making my selection. So I just use my 2 fingers and rotate the image without interfering with my work flow, and I just carry on working.
On top of that, the pen has 2 buttons on it as well. I use the button closest to the pen point for scrolling. Just hold it in, that turns the cursor to Photoshop’s hand tool and I can scroll around and move the image.
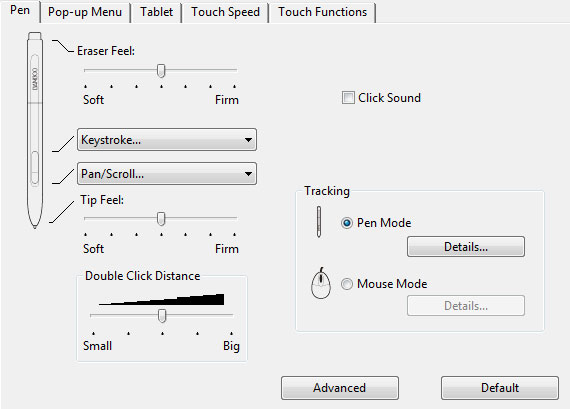
The second button just to the back of the first one, I created an automated keystroke. Ctrl + Alt + Z. This is for the undo option, in case I need to go back several steps.
If you turn the pen over, it has a rear stub as well. This is used for the eraser tool. I have left this as standard. (Not even sure it can be changed)
Now, I know these types of tablets are not really the cheapest, nor the most expensive, piece of kit you will invest in, but it certainly is one of the most valuable. Well, in my opinion.
I picked my one up for around £75.00 a few years ago and haven’t felt the need to upgrade as of yet.
Just shopping around on the net and the Bamboo Pen Small (my tablet size is a small) appears to going for around £50.00 It appears to have everything my model has, except for the touch functions, which, as mentioned, I hardly use.
Given the chance, and money, to upgrade… I would upgrade to the Wacom Intuos 5 Touch Medium. But at around £330.00, it will have to wait until someone gives it to me as a gift or I win the lottery 🙂 That is all for another tutorial and another time.
Below is a little video I found off youTube, showing just exactly how these tablets work. They go through several different items and also show several different demonstrations. He has a lot to say and it goes on for around 24 minutes. Feel free to fast forward to the bits of interest to you.
Leave a Reply